
For the launch of our F:X Pro filter holder Mark III, we were looking for partners who could put the filter holder to the test in practice. Landscape and nature photographer Marvin Schmidt, known for his meticulous and precise work, had the opportunity to dare a practical test. Good preparation on his part, the creativity he brought, a deep understanding of image composition and many years of experience with our F:X-Pro series and other products make him the perfect tester.
The benefits of optical filters in photography
Optical filters have always played an important role in photography. They can not only create certain effects, but also help to extend exposure times and react flexibly and quickly to various lighting situations. For this reason, Marvin Schmidt tested under real conditions how an innovative rectangular filter holder, in conjunction with the appropriate photo filters, becomes a versatile and reliable tool with which you too can easily implement your creative visions.

A summer snapshot with the F:X Pro Filter Holder Mark III
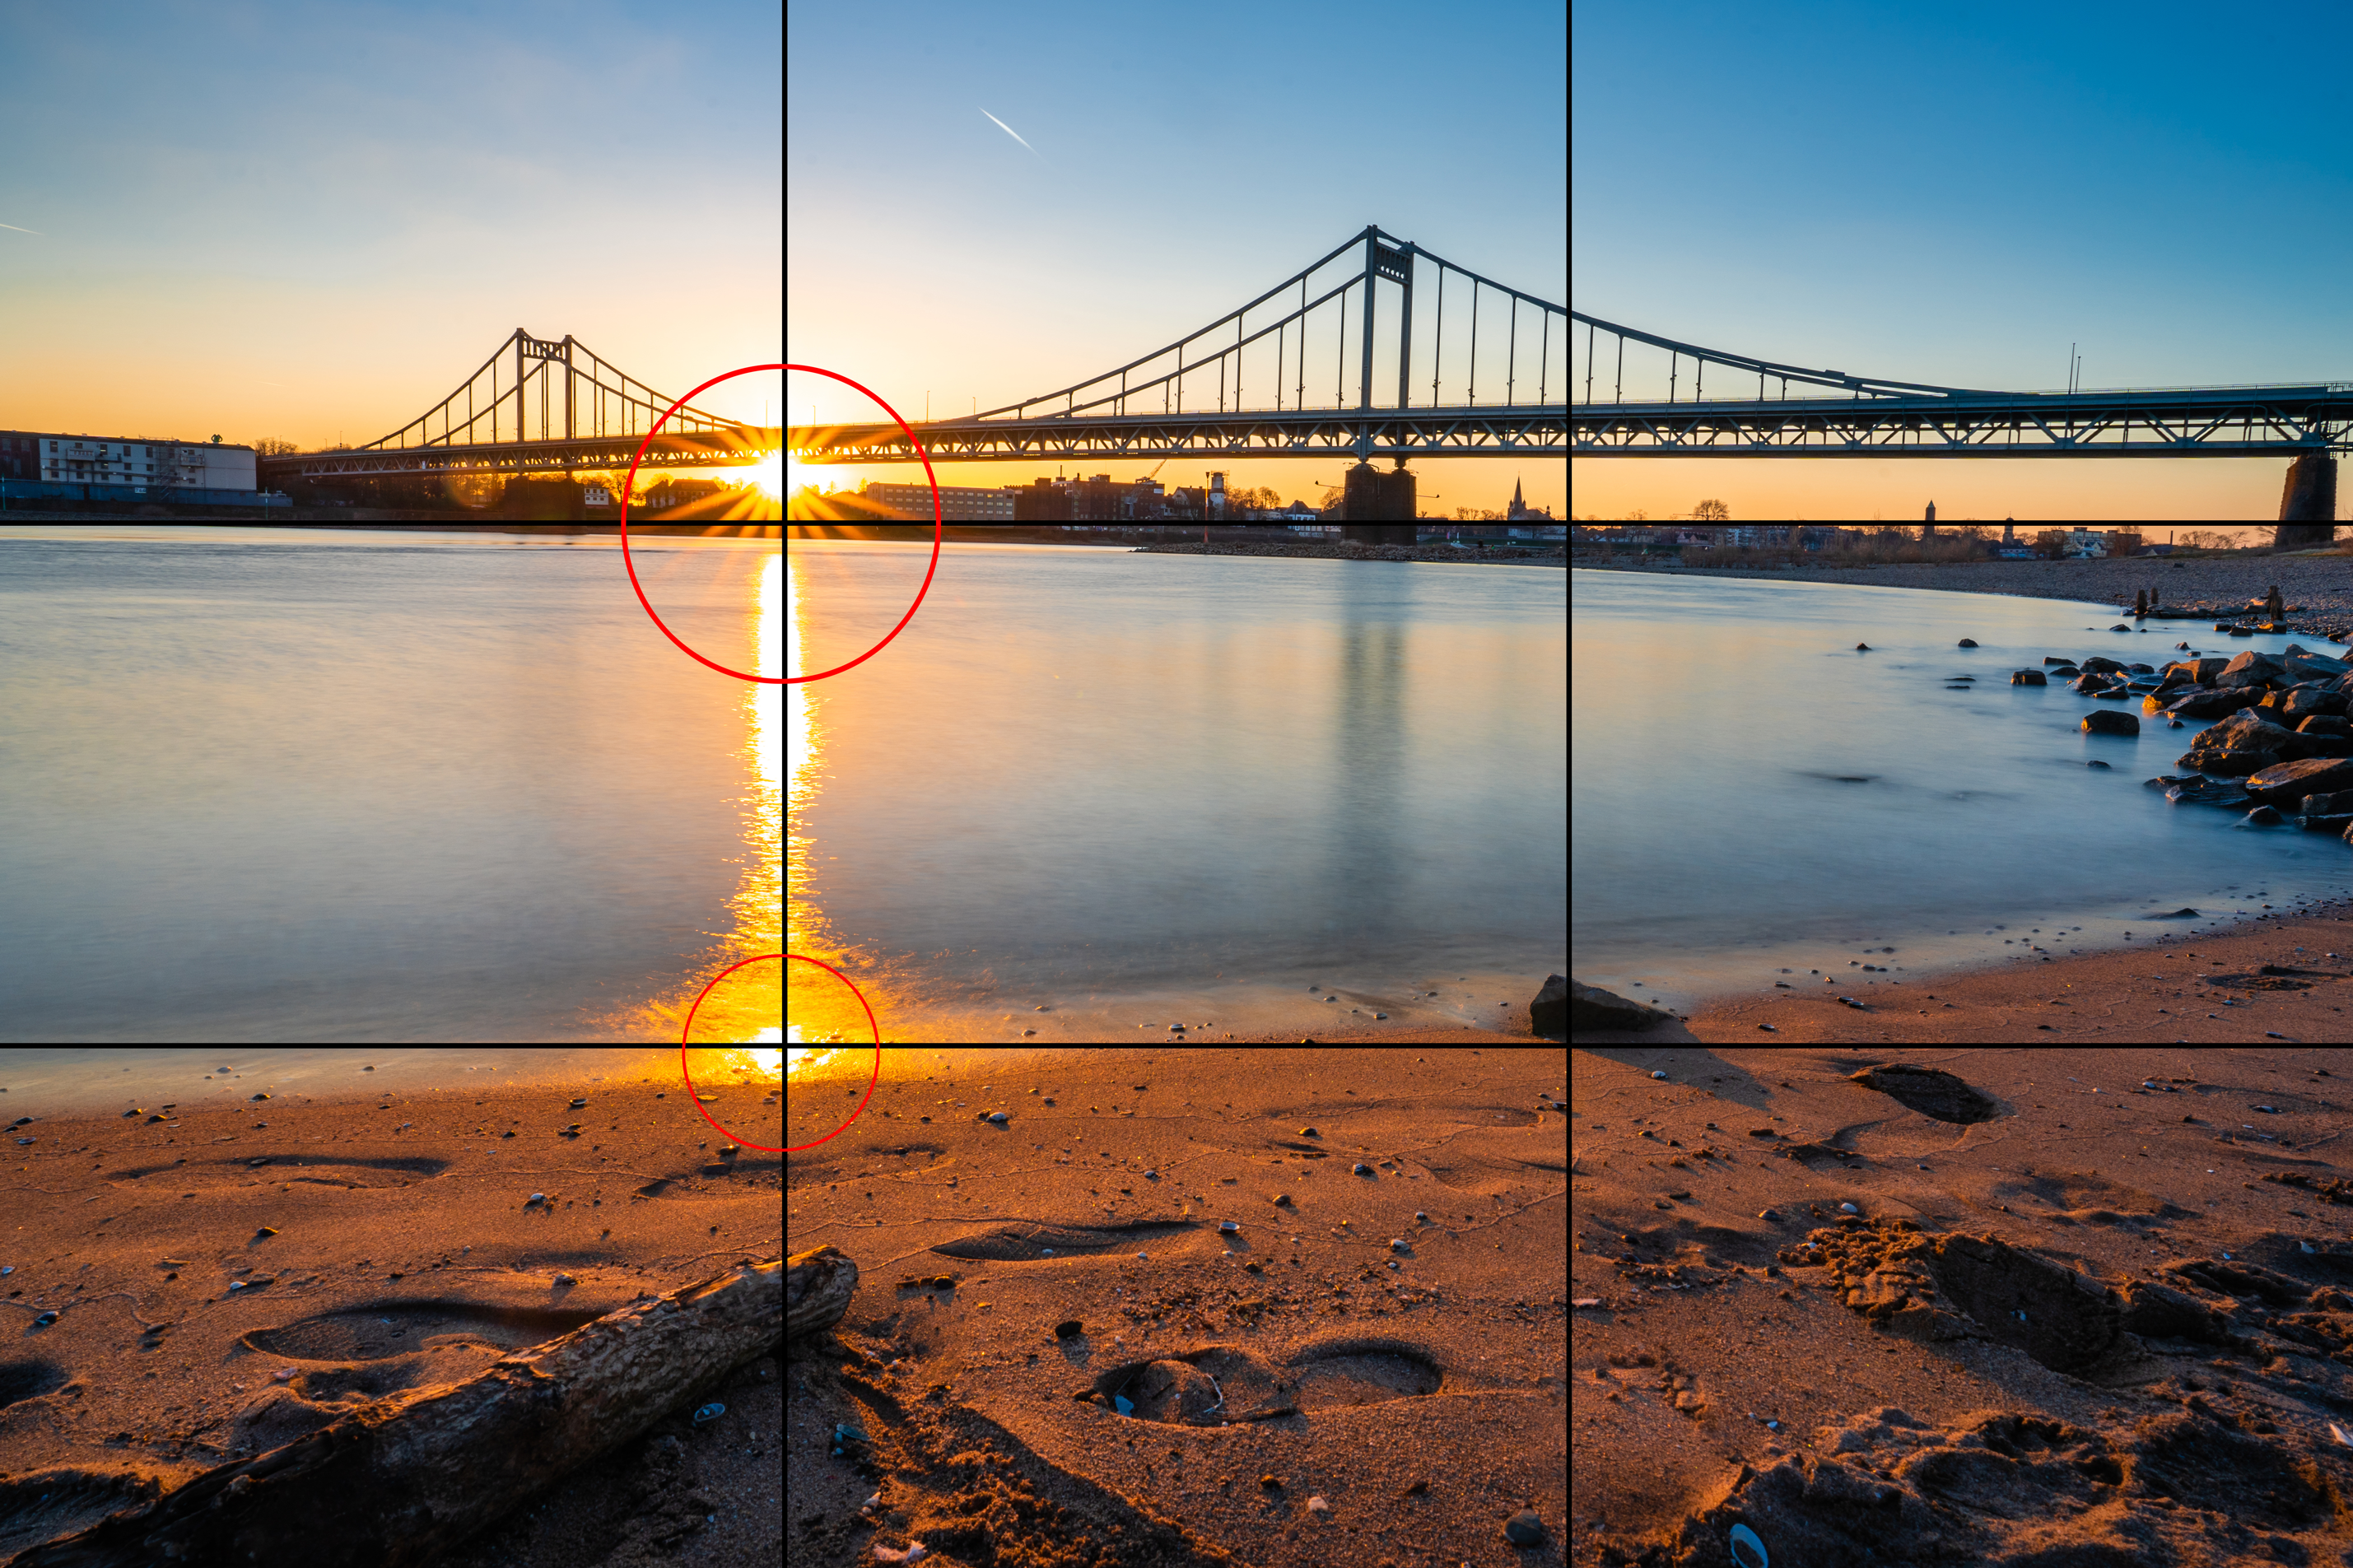
The goal of the practical test was to create a summery beach atmosphere in local climes at the Uerdingen Rhine Bridge in Krefeld. The challenge for the photographer: the Krefeld chemical park and the city center. With the right equipment, precise preparation and creative image composition, he wanted to create an aesthetically pleasing shot without the city center and the chemical park becoming the focus of the shot. Particularly challenging for him in this shot was also the fact that there are not many places in the area that offer fine sand as a foreground. Mostly, only meadows or rocks can be found at the location, which, from the photographer's point of view, would not have created a summery atmosphere at this point. Accordingly, the possibilities Marvin Schmidt had in this case seemed limited at first glance.
Preparing the shoot: Composition and image design
For Marvin Schmidt, it is important to have a fairly precise idea of the image before the shoot and to be able to draw on the full potential of the F:X Pro Master Kit Rectangular Filter Mark III. To hit exactly the right moment at the Rhine Bridge, he used well-known apps that showed him the exact position of the sun at a certain time. The sun, captured as a sun star, was intended to be an eye-catcher directly under the bridge. This meant that only a few minutes remained for the shot.
Once at the location, Schmidt recommends not immediately setting up the tripod and attaching the camera. At first, he always takes the camera in his hand and tests various perspectives. "Close to the ground, at eye level or a good middle ground, without a tripod you are much more flexible when testing perspectives," says the photographer. After the potential perspective was found, the tripod could be set up and the composition could then be planned in detail.
For this shot, Marvin Schmidt "cheated" and refined the composition by hand. The trunk placed in the lower left corner was not originally in that spot, but it fulfilled several purposes in his composition. Primarily, the trunk from the lower left edge of the image served as a leading line into the image and as a direct extension of the sun's ray.
"Here, the viewer of the image is drawn for the first time to the main motif, the sun shining through the bridge," the photographer explained the idea behind his composition. Another function of this trunk was that it acted as a "blocker." This means that if the viewer's gaze wandered, it should always be directed back to the main motif. In addition, the riverbank served as another leading line, which, in combination with the bridge, also directed the gaze back to the main motif.

To be on the safe side regarding his composition, the photographer made sure that the sun was in the correct perspective. The brightest specular point of the sun was located almost exactly at the intersection of the rule of thirds. Furthermore, the composition was roughly divided according to the rule of thirds in a ratio of 1:3 (2/3 background, 1/3 foreground). This contributes to a subconsciously perceived harmonious image structure.
The photo equipment in practical use
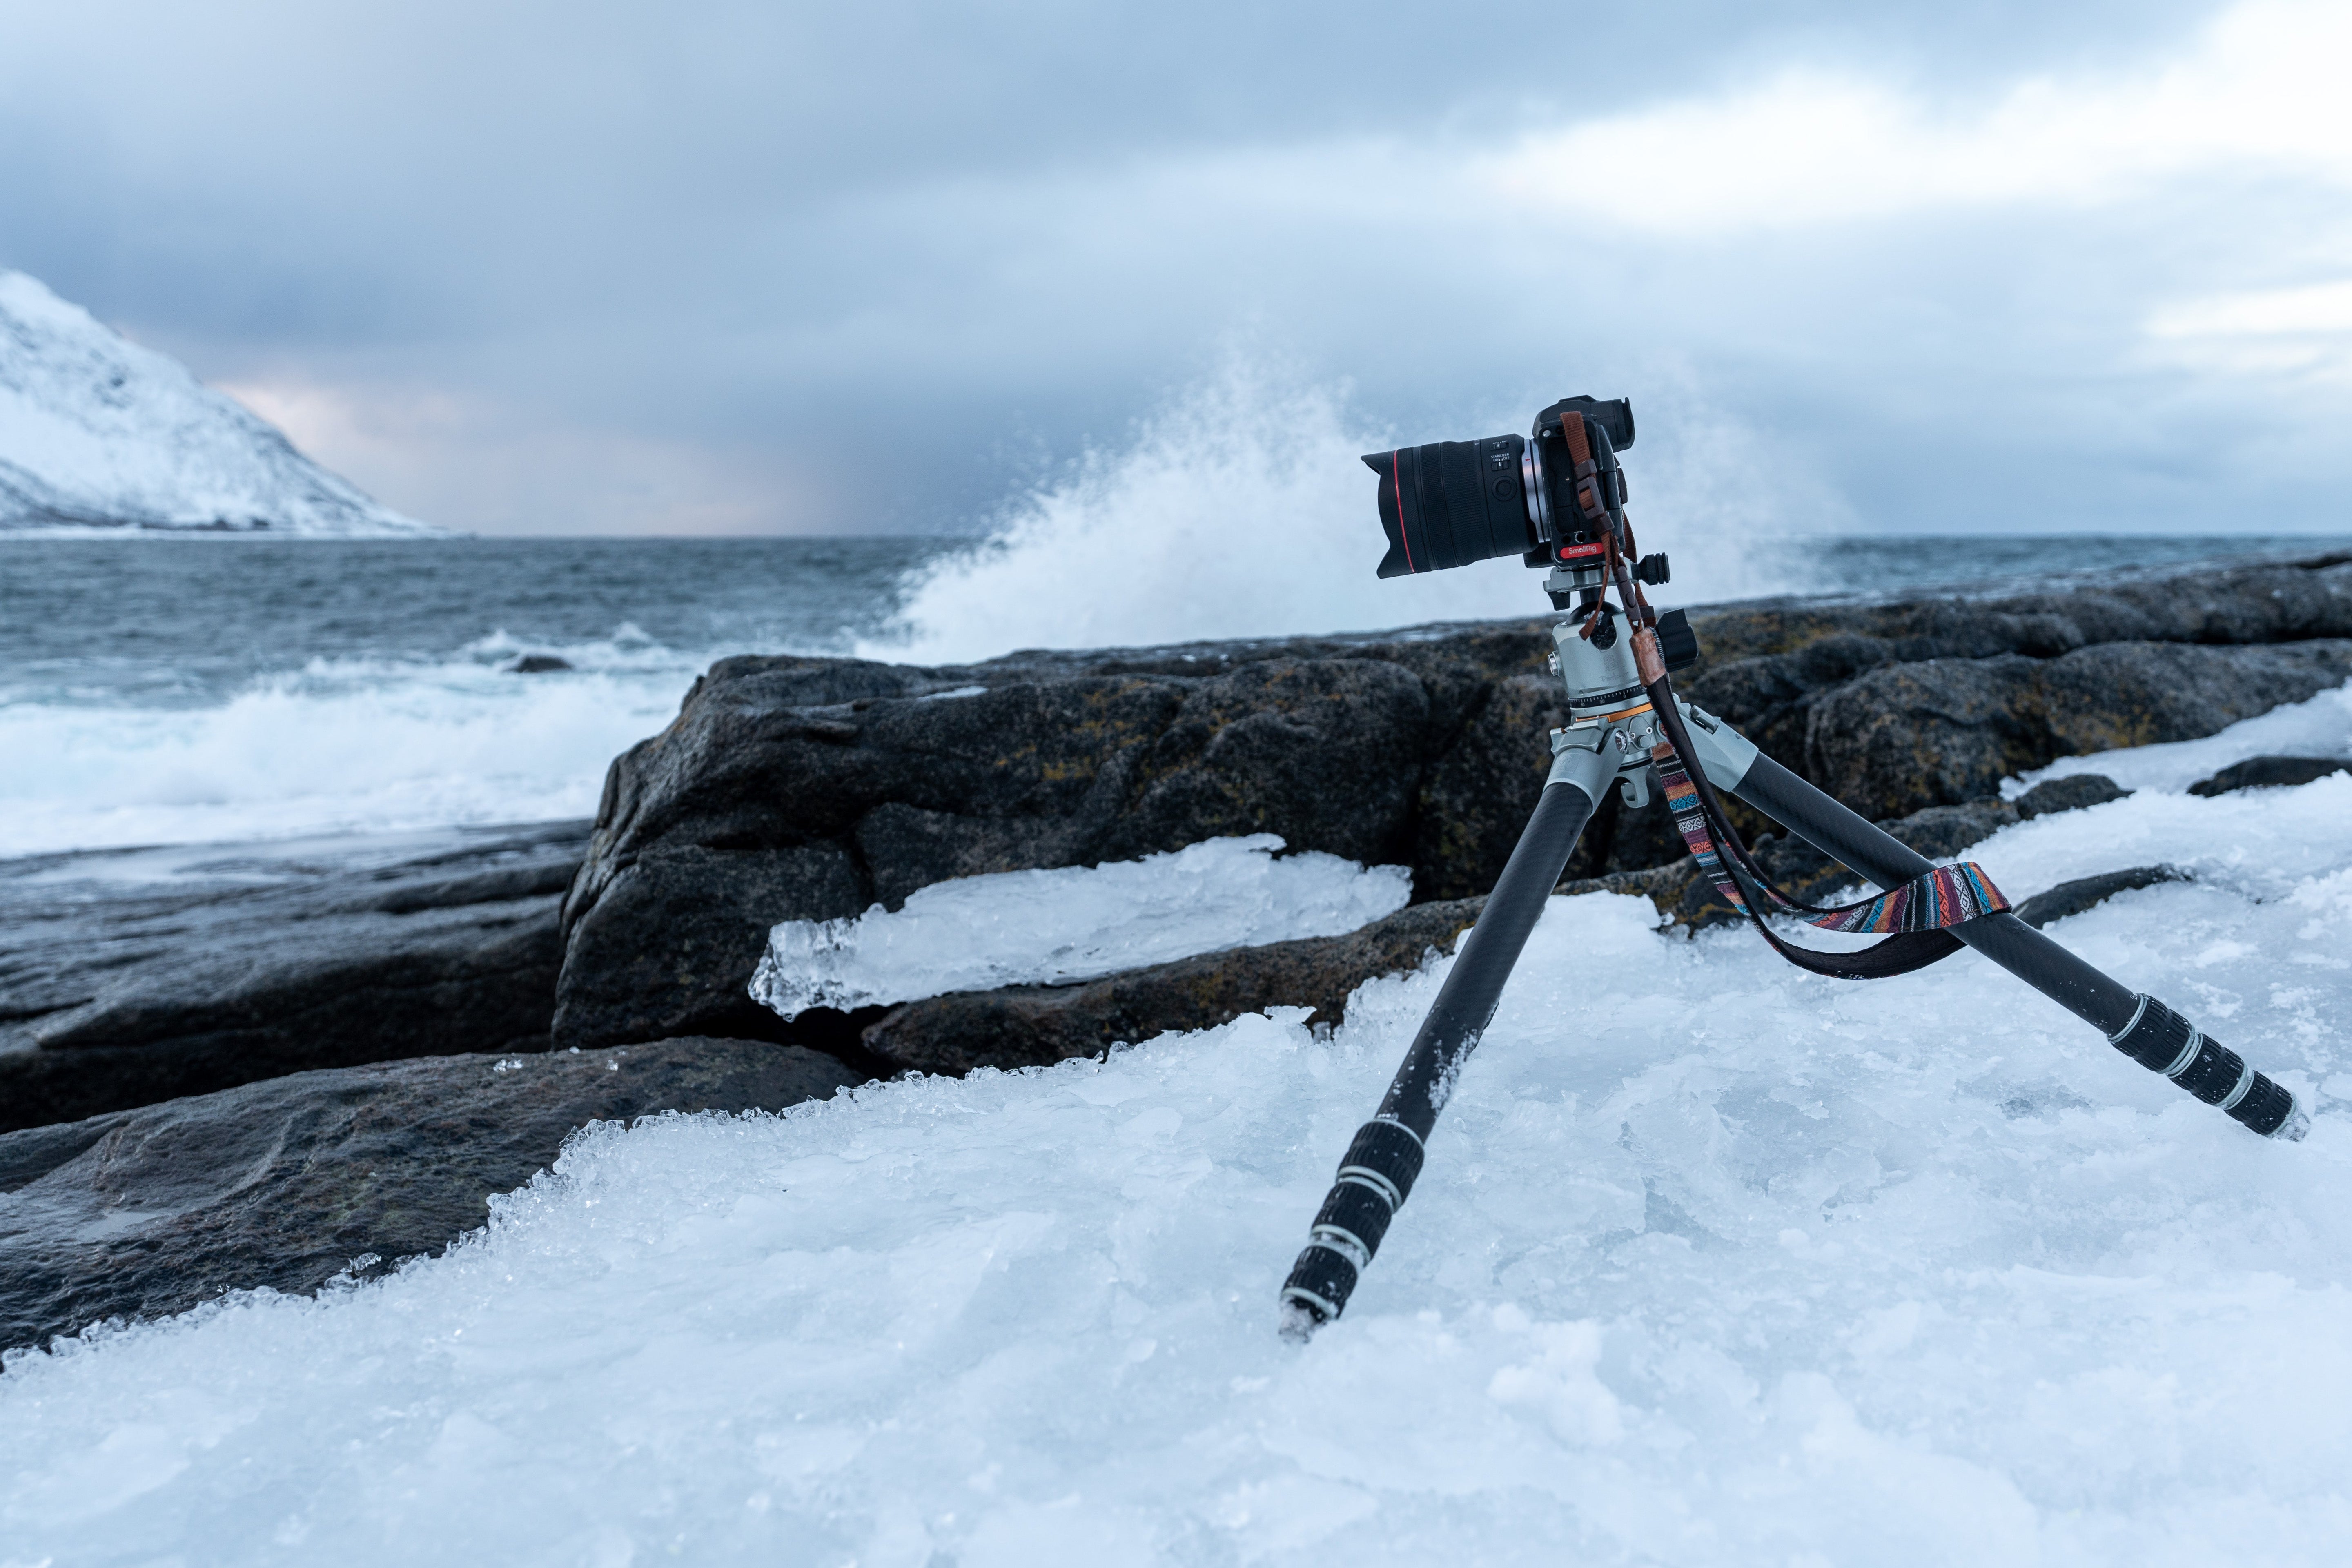
Once the photographer was satisfied with his image composition, he moved on to preparing the equipment. From his perspective, a tripod was absolutely necessary here, as he wanted to work with long shutter speeds of 6 seconds. Only with a camera tripod could he ensure that these shots would succeed and not be blurred.

For his shoot at the Uerdingen Rhine Bridge, in addition to the F:X Pro Filter Holder Mark III, he used the following equipment:
- Sony a7III
- Tamron 17-28 mm f/2.8 and Tamron 28-75 mm f/2.8
- F:X Pro polarizing filter
- F:X Pro ND64 Rectangular Filter
- C6i Carbon Tripod
For the motif, he deliberately opted for a combination of polarizing and ND filters. Marvin Schmidt generally always uses a polarizing filter when he photographs water. He explains that the filter, depending on its positioning, can filter out reflections from a variety of surfaces (such as water, stones, and much more). This often not only creates an interesting image effect, as Schmidt finds, but also makes the colors, both in the sky and in the water, more vibrant. Clouds can also be wonderfully accentuated with a polarizing filter, if any are present.

With an ND filter, he took the opportunity for longer exposure times and to depict a "mirror-smooth" Rhine. Due to the strong current in the Rhine, an F:X Pro ND64 rectangular filter was sufficient to achieve the desired effect. Especially on the stones at the right edge of the picture, you can wonderfully see the achieved effect in the result. It looks much calmer than with a fast shutter speed, as can be seen in the following picture without the use of an ND filter.

To capture the most beautiful possible sun star in the pictures, the photographer recommends closing the aperture. In most cases, he works with an aperture of 18.
"With an aperture of 22, for example, the image would start to not be 100% sharp anymore. I calculated the shutter speed of 6 seconds in advance, knowing that I wanted to use an ND64 filter," Schmidt explained his decision to usually work with the aforementioned aperture. He adds: "For long exposures, it is important to set the focus manually in advance; autofocus no longer works with the filter inserted. So, all settings (except for the shutter speed) should be adjusted before inserting the filter, the composition should be right, and then the filter can be inserted."
This allowed him to optimally test the image section and subsequently the desired effect with the inserted ND filter, achieving the following result.

| Camera | Focal length | ISO | Aperture | Exposure | ND Filter |
|---|---|---|---|---|---|
| Sony a7III | 20 mm | 100 | F/ 18 | 6 sec. | F:X Pro ND64 Rectangular Filter |
If the ND64 filter effect had not been sufficient at this point, or if he had wanted an exposure time of more than 30 seconds, Schmidt would have also had the option of inserting another ND filter into the filter holder. However, he notes that most cameras do not inherently allow exposures over 30 seconds, so-called bulb exposures. To circumvent this, a cable release would have to be used.
A tip from the photographer: Further subject possibilities
Once the main subject has been successfully captured and the perfect snapshot has been taken, the photographer advises taking some extra time at the current location. Especially after sunset, the onset of the blue hour can lead to interesting images for potential secondary subjects.
Marvin Schmidt was also able to capture another subject after a quick change to a different lens and the F:X Pro ND1000 rectangular filter. What may look like a completely different location was actually just a few steps away from his main subject. The filter used created a small fog effect on the detailed shot by softening the water, just like in the previous shot.

| Camera | Focal Length | ISO | Aperture | Exposure | ND Filter |
|---|---|---|---|---|---|
| Sony a7III | 75 mm | 100 | F/ 18 | 30 sec. | F:X Pro ND1000 Rectangular Filter |
Conclusion of the shoot and the F:X Pro Filter Holder Mark III used
After the shoot, Marvin Schmidt was convinced. In addition to his preparation, the F:X Pro Filter Holder Mark III could be quickly attached to the camera lens. The magnetic polarizing filter could be directly attached to the base ring with a simple "clip-in" and was held firmly in place by the magnetic mount, which prevented it from slipping in this case. The base was also attached to the base ring extremely quickly via the new Easy-Lock system. It would have been possible to combine different ND filters or even add graduated neutral density filters via the two filter slots.
The entire precise craftsmanship of milled aircraft aluminum and the easy workflow with the F:X Pro Filter Holder Mark III impressed the landscape and nature photographer in terms of price-performance ratio. Due to the simple design and the flexible use of different filter types, Marvin Schmidt can only recommend the F:X Pro F:X Pro Master Kit Rectangular Filter Mark III including the new third-generation filter holder.


Share:
Filter Holders Tested by Professional Photographer Frank Fischer
Creative Outdoor Shoots with the LUMIS Mini I-Light